Wednesday, June 30, 2010

The one?

So I think I found it. And it is only $205, which is a little pricey but we'll see how I feel as we get closer. I probs should go dress shopping first and try some things on (hey, if you can try on a $5,000 dress, why should you not?)

But I think, with my sash, this dress would be perfection. Plus...it has POCKETS!!


Oh, another update. I received my contract for the venue and ceremony site in the mail today. As soon as I sign it and return it, I have to get them the money within 10 days...!!! Whew, hopefully this is my only big spending item and all the others things are cheap and free :)

Until next time,

11^3

Dress...

OK, so more on the dress. I found a couple more that could be the ones. And they are SUPER cheap. According to the knot.com's wedding budgeter, I can spend $300 dollars on a dress in my budget, this one is only $105.99 (marked down!)

Also, the following found on knot.com are looking pretty nice today. I am having a bit of a hard time trying to find one I REALLY like, but these are not bad.
The first one has a perfect beaded area around her waist where my crimson sash could go. The second is a tad sexy for a wedding dress, but I like the top (maybe with a not-so-dramatic slit...)

ok, time to go back to work from my lunch break. I am going to try to make an appointment with a bridal shop soon and see if I can't find one in a store that is within my price range and that I love!!!

soon,

11^3

Tuesday, June 29, 2010

Decisions

So we have made some serious decisions in the last few days. FI is finally realizing that we need to start thinking about everything, even though we are over 17 months out. (499 days to be exact) :) **Note: these are just random ideas and would just like to get them down, they are in no logical order and I apologize ahead of time for rambling.

I thought I wanted to do a fallish color theme since the wedding is in November, but I realized that I can do whatever I want. FI is a big Red Wings fan, so I thought red, white and black would be a beautiful color scheme and would make him feel like I am including his feelings into the planning. The color red will be bright, crimson red like a rose. I want the bridesmaid dresses to be this color (I am going to let them pick out their own dress but I want it to be exactly the right color and preferably the same length, don't care about how the dress looks up top.) Here are some of the things I like for Bridesmaid dresses:

***All dress pictures from knot.com***

I am going to wear a white(ish) dress, with a crimson sash around my waist, possibly with a organza rose that I plan to make like this one: (except less violet and more crimson)

Ok, next thought. Our song. FI told me today that he bought a Stevie Wonder song off of iTunes that will be our first dance song. If he comes to me with that kind of excitement, I don't care if it is the worst thing I have ever heard, I will dance with him and love it. Also, Stevie Wonder is a music genius, so I know it can't be too bad ;) He told me he wanted to listen to it with me for the first time (meaning he wouldn't send it to me or tell me the title to look it up) which I think is very sweet. So we have that covered. I think the bride+father dance and the groom+mother dance are going to be at the same time, and to Brown Eyed Girl (I know, super cliche, but it is our songs, apparently) A friend of mine is being the DJ and I know he will do an amazing job. He is so talented and willing to do it for free!

Overall feel of the place: crafty, homemade, casual in a really trendy but sophisticated way, homey, put together with care, adorable, FUN! Ideas: all the plates are borrowed and different, different silverware, napkins all made of different fabric, lots of crochet. I'm actually in the process of making the cake topper (post to follow as I finish) but that is based off this design:
I'm going to personalize them with a little hockey stick for the groom and a red sash and flowers for me! Kind of silly, but UBER cute, and I can make it myself!

So my brother agreed to be the officiant. He is such an amazing person and I am so blessed to have him in my life, and I was so pleased when he agreed to be the officiant. He is funny and charismatic. Also I have 2 brothers and FI has 2 brothers and I didn't necessarily want to fill up his party with all those people, so one is now taken care of. Have my MOH picked (my very close cousin) and know I will ask my lil sister (she is 11 but will be 13 when the wedding comes around) Other than that, I have a couple of other ladies in mind (not sure if they will accept!) I have a super exciting way of asking them though. I'm thinking of sending them a small box in the mail and when they open it up there will be a ring made with one of those crochet roses I blogged about the other day, and it will read "will you be my bridesmaid?" and then there will be instructions on what to do if yes or no (yes, the can use the ring to match the color and pick out their dress), and no, they can send it back :)

humm...what else? I am so tired but can't sleep because I have too much on my mind. It is 3:12 and I have to take my brother to the airport tomorrow (or today, really) at 7:00 (we have to leave home by 6:30). sigh.

Oh, I'll leave you on this note. MY DRESS! So, haven't gotten anywhere near the dolla bills to think about purchasing a dress, but I have a good idea what I want. I don't want big, don't want over the top fancy sequins jazzy stuff. I want simple and elegant. I found this on the knot in the bridesmaid section:

However, I want the red flower sash in place of the green bow (initially envisioned getting exact same design with crimson bow, but I like the organza flower sash a bit better, and I also like the fact that I get to MAKE it!)

So I will leave you all with that. Wish me luck on the sleeping front!

11^3

Saturday, June 26, 2010

Crocheted Roses

So here is another idea I've had. I am big into crocheting, well...I can crochet. Anyway I decided, since a lot of people are using fake flowers/paper flowers/diy flowers for their centerpieces and bouquets, I needed to come up with something that looks cool, as I won't be using real flowers in my wedding.

For some reason, this project was the first thing I thought of when starting to plan for my wedding. I looked up a pattern online, and tweaked it to my liking and started making them! They looked kinda funky at first but now each one looks better than the last.

Here's the final product:

And here is how I got there:

Supplies:
• Yarn (any type will do, just make sure you use appropriate hook sizes)
• Crochet hook (bigger ones will make your rose bigger with more holes and smaller ones will be more compact)
• Yarn needle

Step 1: If you don't know how to chain stich, please read about it here
Chain 45

Step 2: go into the second loop from the hook and do a single crochet stich (info on that here)

Step 3: skip a loop and double stich into the next loop. (info here)
chain 1
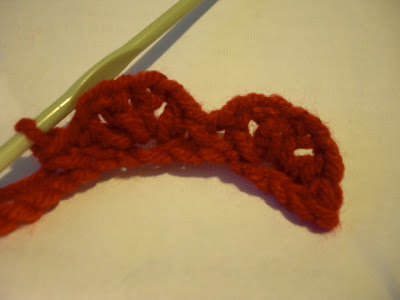
do 3 more double stitches (and 2 more chains, you don't have to chain on the last one) in that same loop. After you have 4 double crochet stitches, skip a stitch and single crochet again, then skip another stitch and start the double crochet pattern above. Should look like this:

Step 4: continue this pattern all the way to the end.

Step 5: If you look at your work, you’ll see that one edge is flat and the other edge is scalloped. Starting at the opposite end of your work to the long yarn end, begin to roll the rose up into a spiral, and roll so that the flat edge stays flat. Attach the yarn needle and sew through the middle and to the other side. Turn the rose and do this a few more times until everything stays in place.

Now you are done!

What you chose to do with it is another thing!
I thought of using it in a hair piece:

Many roses in a bunch:

One rose:

or a ring!

Hope you enjoyed and happy crafting!

How to make a Ring Bearer's bow tie out of an old neck tie

Here is my first DIY post. I have no reason for this post other than I was excited to do a DIY post. I will make one of these for my ring bearer, but not using this tie, I have another tie to use. This one is for experimentin'

Supplies:
• An old tie (or any piece of fabric)
• Stich remover (optional)
• Scissors
• Needle and thread (or a sewing machine, whichever you prefer)
• Iron (optional)

That's it!

Step 1: Find an old neck tie that your future husband doesn't like anymore or that your dad has discarded. If you like the pattern...use it! This can also be substituted for any old piece of fabric, but I like the idea of using a neck tie that is no longer in use.

Step 2: use the stich remover to open up the tie (you can also use scissors for this).

Step 3: lay the opened tie flat down on your surface. You can iron it now if you wish.

Step 4: cut a 6 in x 4.5 in rectangle out of the tie

Step 5: fold the piece of fabric over LENGTHWISE with the inside being the side you want to show out at the end. Sew all the way around the edge, except leave a 1 in hole so you can turn it inside out.

Step 6: Turn it inside out and sew up the small hole (or mine just tucked in nicely, I didn't even have to sew it) Then find the middle and scrunch the top and the bottom together and sew! I went around it a couple of times to make sure.

Step 7: Now, you need another piece of fabric to go around the sewed part in the middle. You can either use some more of the fabric from the tie or another color. I chose to use the fabric on the back of the tie for mine, which was brown. Cut a small piece, about 1 in tall and 2.5 in wide.


Step 8: fold the fabric over and sew (either with a machine or by hand)

Step 9: this was the most time consuming part...turning that little piece of fabric inside out. But I did it. Then take the little fabric strip and wrap it around the middle of your bow tie and sew it to the back.

That's it! you have a little ring bearer bow tie! Depending on how you want to do it, you can use an elastic band or a clip or even a ribbon to get that bow tie on. Yay!


My ring :)


This was my fiance's mother's ring. It is Emerald (my birthstone) and diamonds (his birthstone) I LOVE it x a million! I am going to get a band that is yellow gold with diamond, emerald, diamond, emerald all the way around.

oh, and I bought the first piece of my wedding day attire:

Found it at Meijer on sale for $5.99, plus it was free because he bought it for me ;)

Our Story

OK, so I guess I should share our story with you guys...

How we met:
Russell and I met when I worked at the People's Food Co-op and Russell worked at the Ann Arbor News. One day, I plucked up the courage to talk to him and we hit it off, however no phone numbers were exchanged. The next week, I was at a party and Russell walked in the door. It was fate. We have been inseparable ever since!

Proposal:
Russell and I had been discussing the possibility of marriage for some time and we both expressed interest in the idea, so I knew it was coming...I just didn't know when or how! So it was going to be my birthday in a couple of hours and we were at my parents' house watching a movie and he decided he was tired so we started to drive home. I missed the turn I usually take to get to our house, so he said "oh well, just go up to the next street." And then when I got to the street we live on, he told me to keep driving. At that point I knew something was up and kept asking him where we were going... He told me to pull into Cobblestone Farms, which is a common wedding location with a beautiful garden. We walked around the grounds for a bit and he kept looking at his watch. He commented that this place would be beautiful for a wedding. Then, at midnight, he set me down at a bench in the gorgeous garden, got on one knee, and asked me to marry him!


Us after we got engaged!

Easy ways to get things cheaply? WIN THEM!

There are so many opportunities to win free things in the wedding world. For example, you can win a free wedding dress at Bonny Bridal!


More information on giveaways to come!

UPDATE**Kristen over at Happily After All (click below to be taken to her site) is giving away a $50 gift certificate to CSN stores! Great purchases for nesting ladies (and people on a budget).

HAL

Friday, June 25, 2010

Online RSVP

ok this is my first DIY post. I just figured out how to save lots of money on your invites. Do them online.

Yeah, some of you might say it is impersonal or that maybe your grandmother might not be able to figure it out. Well someone will be able to help her (or she could call you and you could put her information for her), and i think it is just as personal as a piece of paper. Anyway, it will save hundreds of dollar bills. And it is super easy to do.

Step 1: set up a blogger account. It won't work with just any blog. I tried it on wordpress and it wasn't supported but since blogger is part of the Google family, it supports the iframe tags you need to make this work.

Step 2: set up a google account if you don't already have one.

Step 3: Once you have a google account, click on the documents tab (may be under "more" in the top left hand side of google)


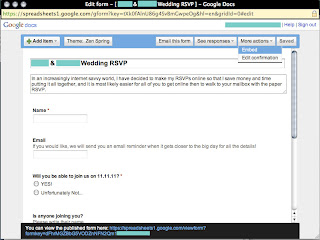
Step 4: Once you are in google docs, click "create new" and go down to "form"


Step 5: Here is where you have to decide exactly what you want your RSVP to look like. I put the following criteria:

• Name (for this I chose a text box)
• Email (for this I chose a text box)
• Will you be able to join us? (multiple choice, options "YES!" and "Unfortunately Not..."
• Is anyone Joining you, if so, please write their names (for this I chose a text box)
• Any comments? (for this I chose a paragraph box)

You can add as many questions as you want or as few as you would like. I am going to have a potluck style wedding so I also asked them to let me know what dish they will be bringing so I can be organized and supply what will be lacking.


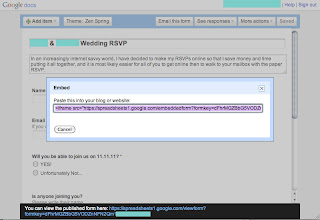
Step 6: Once you have created your form, you need to go to "more actions" and down to embed. A hyperlink will come up that says "copy and paste this into your website or blog"

Add Image

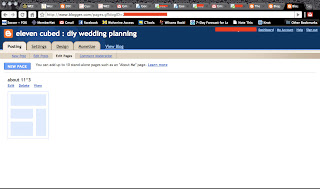
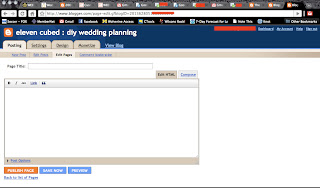
Step 7: Go to the blog you made earlier on Blogger. Make a new page. Name your page anything you would like, I named mine RSVP.


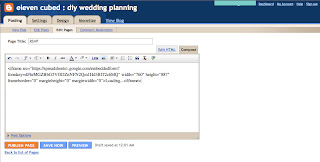
Step 8: paste the code in the EDIT HTML tab. save and view.

Step 9: You can adjust your blog pages so that the form fits better, but it should look like this:


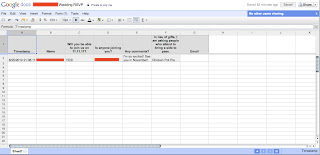
Step 10: now fill out a sample one to make sure it works. It should have made a google docs spreadsheet in your google docs page, with the same name as the form you just made.

Now when you send out your STDs or if you still want to send out invites, you can just direct them to your web address and then it will be easier for everyone!

p.s. sorry the pictures are so small! Still getting used to this blogging business. If you click on them they get bigger!